


Splash of Color
Posted: 2016-01-27 Filed under: General, Guildsmanship, Workshop, WPF Leave a commentPutting all the fragments together gives the basic shape of a meta-model, but doesn’t explain how to get to this:
The first thing to do is to define the set of brushes that can be used to paint the miniature. This is done by opening the “brushes” node for the meta-model in the package explorer.

Resulting in the brushes editor:
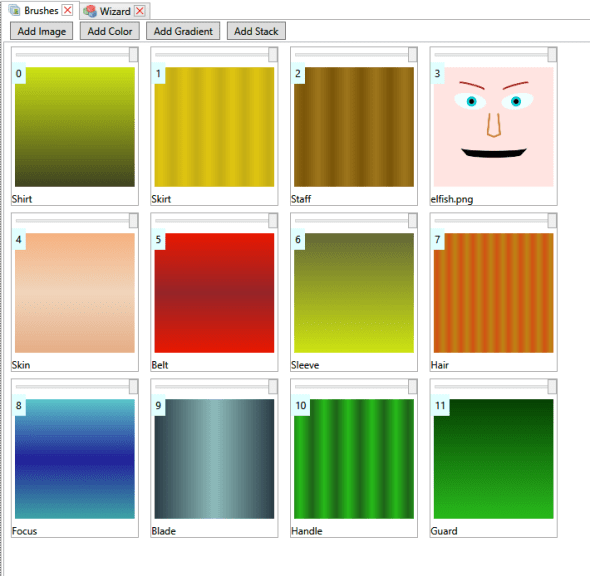
From within it is possible to add colors, images, gradients and stacks. Colors are pretty self-explanatory, they are solid colors. Images are images available to the model either bound directly to the part, or referenced as a resource in the package. Gradients are linear gradients based on WPF gradient brushes. Stacks are sets of brushes that are overlain on top of each other (assuming that the upper brushes have some transparency. Stacks allow multiple directionalities to gradients within a brush.
Next, opening a gradient brush shows the gradient editor:
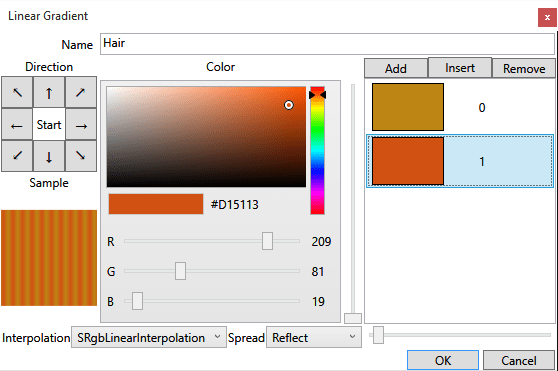
The directionality of the gradient is selected via the array of buttons with arrows. The gradient stops are modified in the list box and buttons on the right side. The slider to the left of the gradient stop list box specifies the gradient stop relative location for the currently selected gradient in the list. The striping effect of the gradient is controlled by the “spread” combo and the slider next to the combo (which determines how the pattern repeats when it ends and how often the pattern repeats).
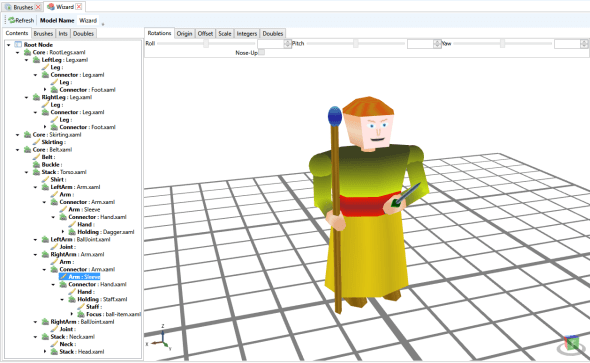
Now, to the actual painting back in the meta-model editor.

The “brushes” tab lists all the named areas that can have brush references mapped, and the currently mapped reference. Right-clicking one and selecting “assign” brings up a visual list of all the brushes that can be applied.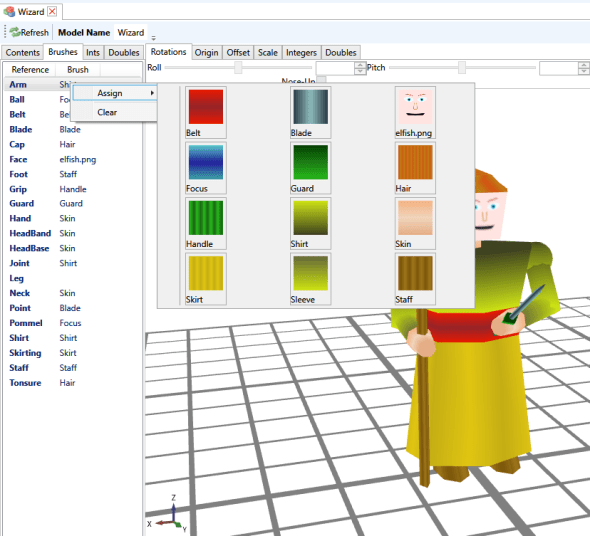
These references are the “global” (for the meta-model) brush references. It is possible to apply variations to individual fragment instances; and this applies to brushes as well as “parameters” such as lengths and radii, and to place more than one fragment in a reference connector.
For example, on the left arm, the first “arm.xaml” segment connected to the torso doesn’t have anything mapped for the “arm” brush, but the “arm.xaml” mapped in it’s “connector” has it’s “arm” brush overridden to be sleeve, which is effectively a reverse direction of the “shirt” brush so that the visual jump at the elbow isn’t so jarring.

Also, I mapped another segment “balljoint.xaml” to the left-arm slot on the torso to create the slightly bulging shoulders.

Finally, to reduce the relative thickness of the forearms, I select the forearm segment, switch to the “doubles” tab, unselect the “yield” checkbox for arm-diameter and freely adjust the diameter.
Resourcefulness
Posted: 2015-11-30 Filed under: Guildsmanship Leave a commentWhen I first started working on the Ikosa Framework, I had the idea of a local folder system to hold system-shared and “module” resources; and also for players to have their own sets of resources, like pre-painted miniatures and character data. I also wanted to be able to package up resources into easily portable format. I eventually learned how to use the .NET API for open-packaging convention (OPC) files, and built my own little system of management around it that included a “parts” namespace that could reference object structures within a single serialized stream and across streams in the package.
Every time I did something major to the structure of the map object model, or some other major infrastructural change to the model space, I had to rebuild any test map I had. Most of this was simply in reloading icons, images, and models (of which over the years I had created a fair number). Even the improvements I made in the workshop UI to allow multiple-simultaneous import wasn’t quite cutting it; setting up a meta-model is a fairly time-consuming that is done almost entirely in the workshop. (I’ll post on that a little later).
Ergo, I eventually defined resource references that could be added to the resource resolution space of the system and defined in a resource container (of which a local map maintains an instance).

I’ve already added quite a few
Image resources are used to source image textures for terrain and faces (I’ve conveniently labeled my references as to which one I intended for which). Icon resources are used 2D XAML images used for the UI selection and presentation, and can be added to treasure troves markers to indicate what’s in the treasure pile. Models are just that: 3D models used for characters, doors and furnishings…basically anything that has an ObjectPresenter to show itself in a local view. Fragments are pieces available to construct meta-models (a type of model composed of fragments…obviously) allowing some in-workshop editing and customization. Finally brush-sets are collections of texture brushes that can be used to paint the terrain. The Brushes resources is a single brush set for texture resolution, which I think I should probably deprecate. I believe it’s utility has been superseded by newer texture mapping features in the models and meta-models; or perhaps it is a fall-back texture resolution system? I’ll have to look into it.
Both the “Faces” images reference and the “Fragments” Fragments reference point to the same Ikosa package, so I’ll give a quick peek into what’s inside:

Package contains a resource container
Images are all faces (duh!). The fragments are a mix of body parts and weapons. I haven’t created a good way to visualize what the fragments look like. If I ever get around to it, I’ll have to add some meta-data streams to the fragments with preview images, it’s either that or hoist them into a meta-model to render them (which leaves open the problems of scale, rotation, and textures; so previews seems like a better choice).
Next up is the terrain Ikosa package, which is the source of references for “Terrain” images, the “Models” model resources, and the “Terrain” brush set.

Some of the images support the models, some support the brush sets
Finally, the icons; I’ve included images of these before, but I’ve expanded the set by a few icons lately so figured I’d add them in and put them in context of a post that explains Ikosa framework resources just a little more:
A couple of design scaffolding icons in there as well…
…I need to clean up that “rod”
One Shiny Ring to Rule them All
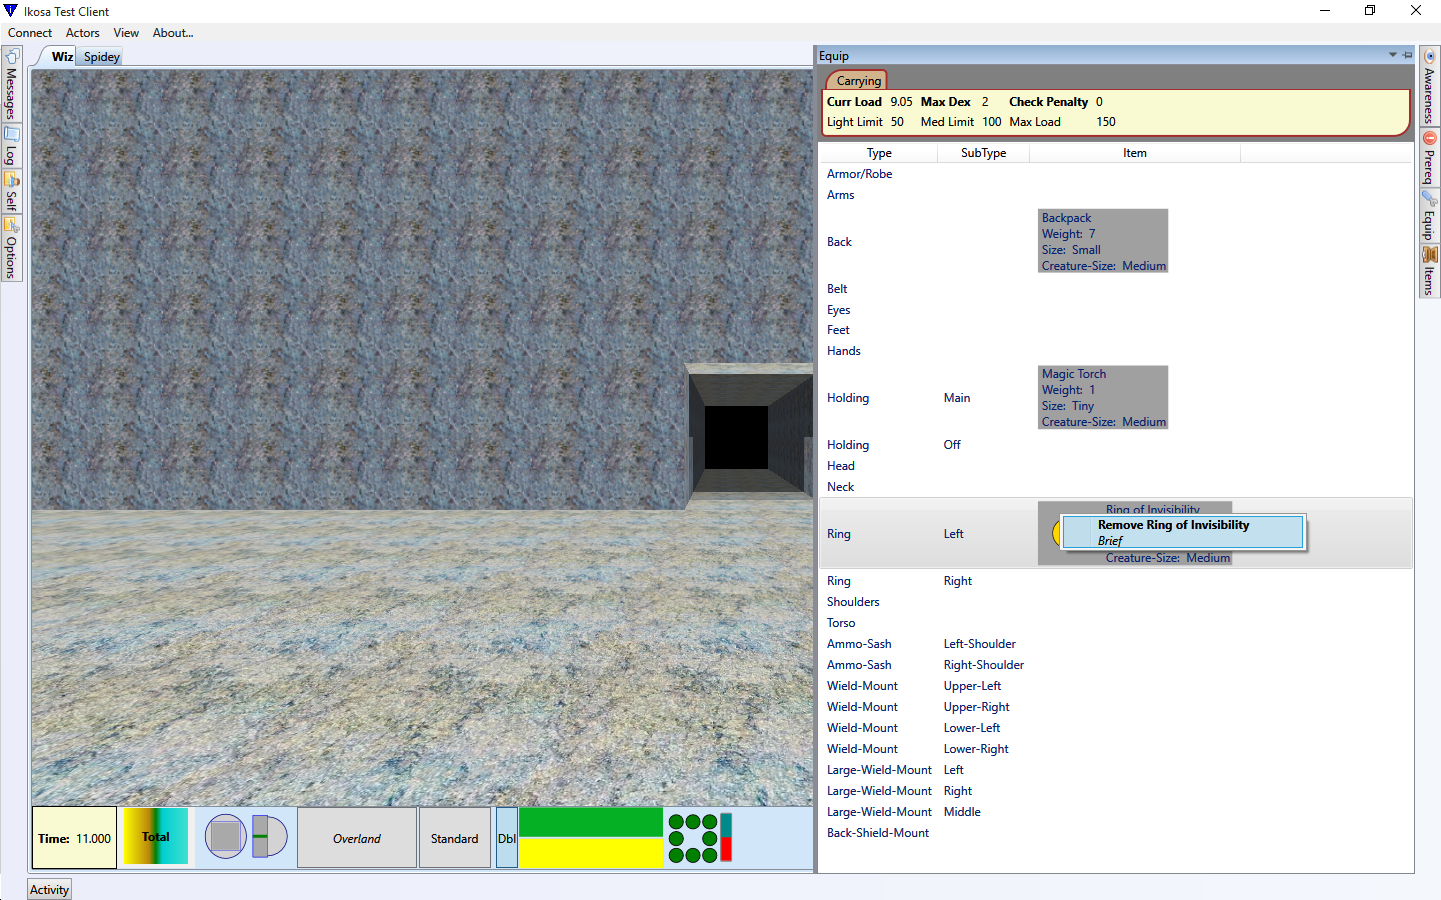
Posted: 2015-08-24 Filed under: Debugging, General, Guildsmanship | Tags: gaming, UI Leave a commentAfter playing around with tactical movement (which I’ll hopefully be getting back to shortly), I spent a few weeks playing around with magic item creation. Rather than go through the litany of development, I’ll cut to the finale: the ring of invisibility; a somewhat classic trope of fantasy.
I’ve had basic support for invisibility built-in for quite some time as the creature awareness system needs to be able to determine what can and cannot be seen. What I hadn’t completed (or worked on) until the past week weeks was the invisibility spell, nor magic items (nor apparently any in-game actions to put on or take off body-slotted items).
So here we are now:

The power to turn invisible comes from a command-word spell activation associated with the ring. Currently, this doesn’t express itself in the context menu of the ring in the equipment panel.
The command-word activation isn’t currently running through an environment interaction, I haven’t completely normalized how the sounds propagation works or which actions require verbalizing (apart from spells with verbal components). One of the many things on my to-do list.
One of the oddities of the invisibility spell is that it requires a will-save:
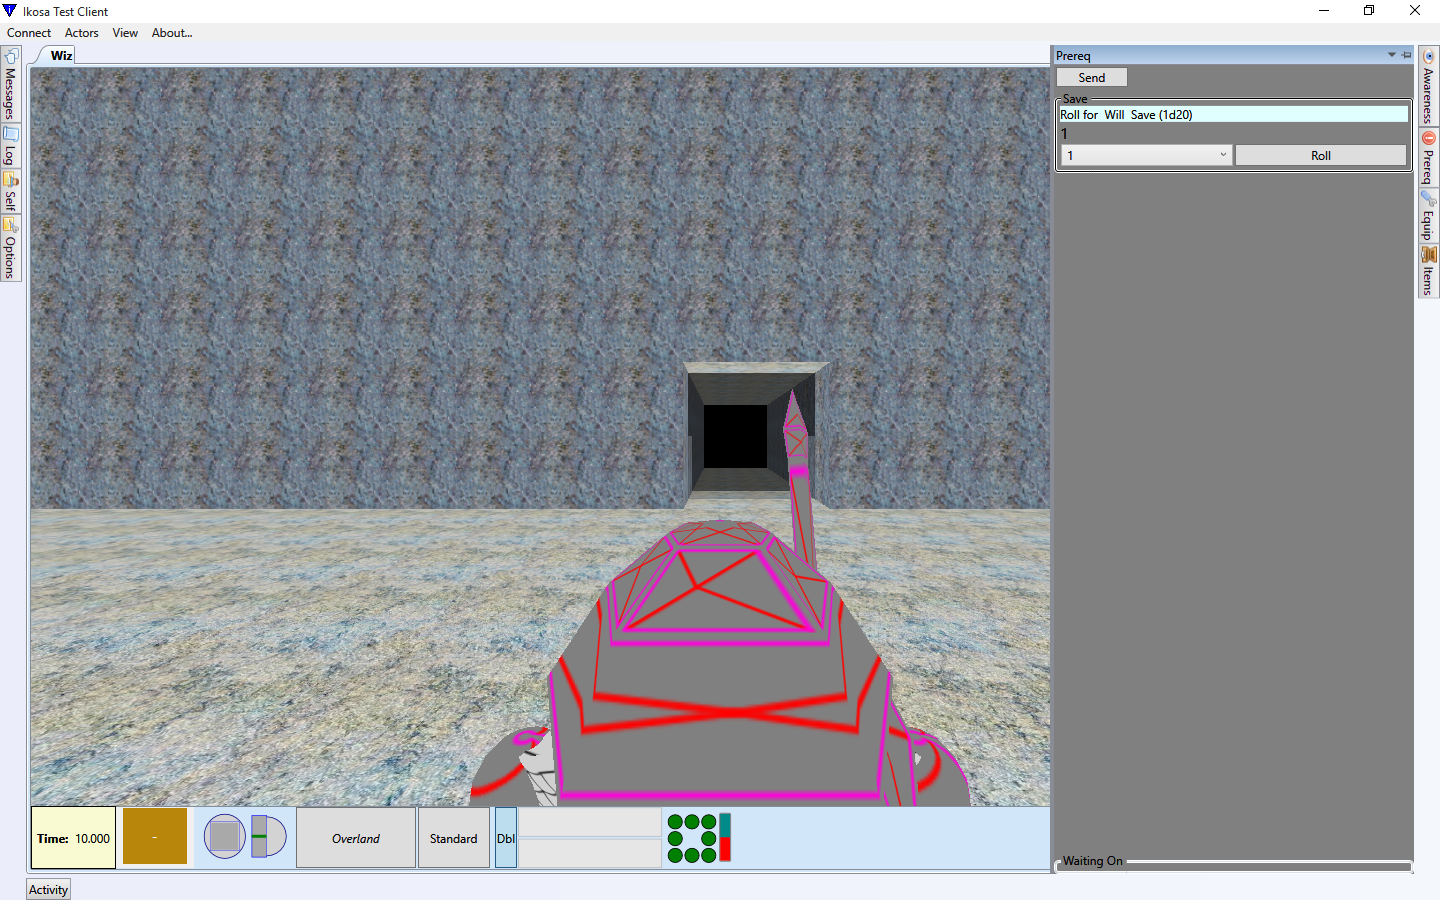
Prerequisites to finish actions do not automatically pop-open the client UI at the moment. Also, since I’m testing with the time-tracker instead of the initiative-based turn-tracker; I can still move while this “dialog” is unmodally waiting for me to send the will save.
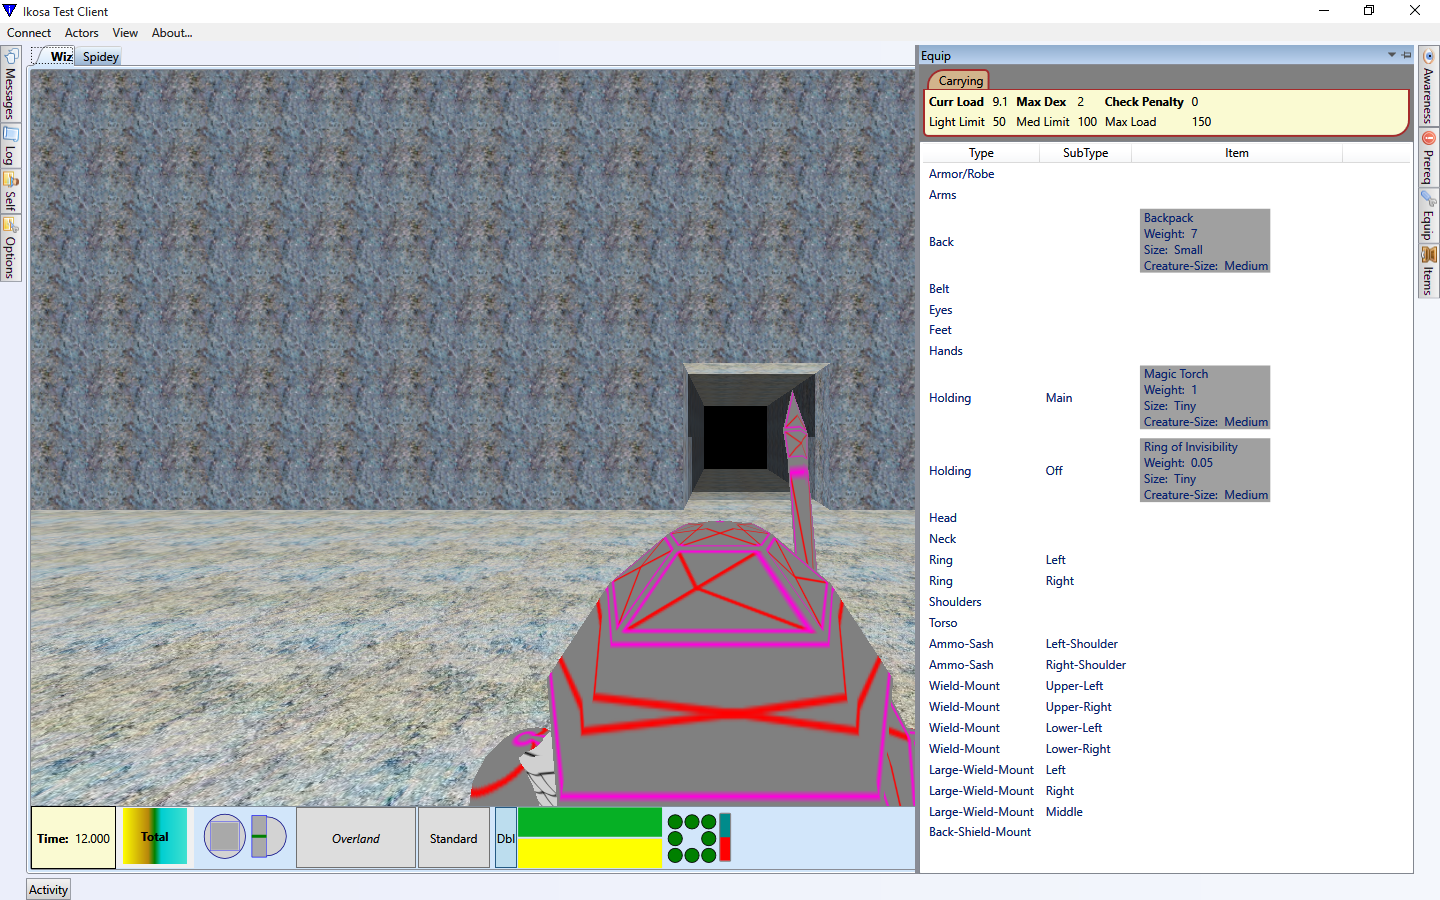
Well, if I saw myself before, I don’t see myself now…

I have to force a refresh by ending the turn. I’ll need to add a “general” refresh step to the client-server communication stream to signal client refresh for any actor with awareness so far.
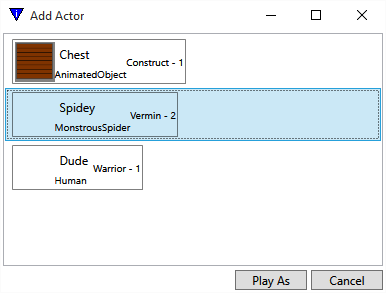
Just to get an outside perspective, I’ll switch to another viewer, Spidey the spider…
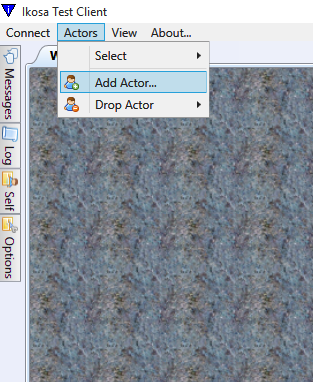
I’ve had a multi-actor client UI for awhile. Certainly makes it easier to test.
Probably should add some portraits to these guys!
Looking through spidey’s eyes and checking his awarenesses, the Wiz is definitely gone…
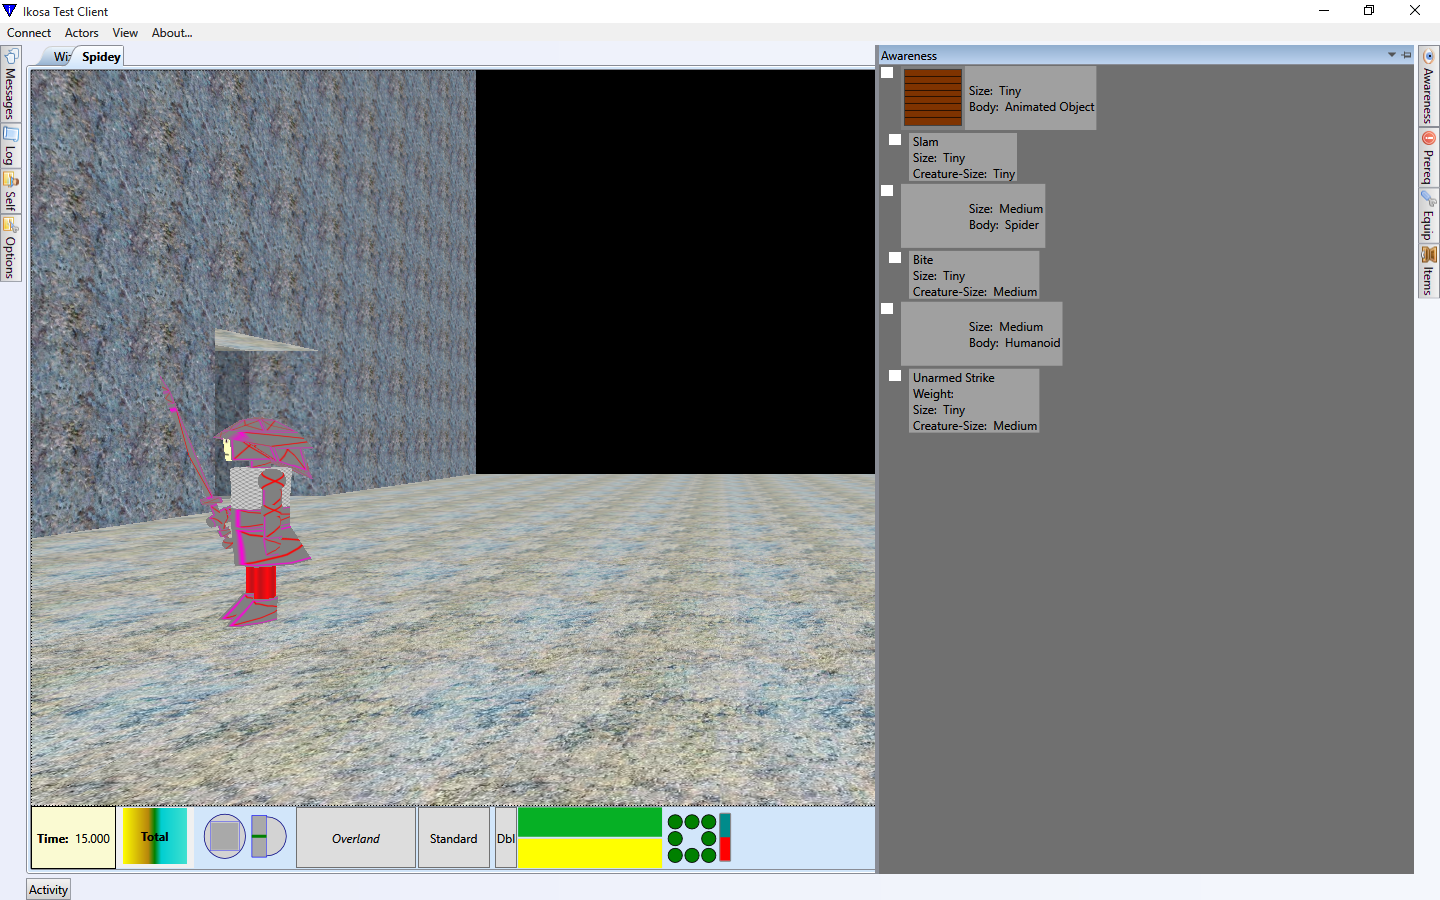
The Wiz should be right about in the middle of the display
Removing the ring will deactivate the invisibility effect…
Not exactly explicitly spelled out in the core-rules, but since a 3rd level casting would have a duration of 30 rounds (3 minutes), removing the ring causing deactivation seems a reasonable way to prevent one ring from enabling an entire party of four. Also, this ring only supports the “personal” spell mode, not creature/object touched mode.
The ring has to go somewhere, so I add it to a holding slot. If there were no holding slots, it would fall to the ground or into a treasure trove (if there was already treasure in the cubic cell).
Well, I can obviously see myself again, now to check Spidey…

I can even select the Wiz in Spidey’s targeting queue.
I have that loosing awareness doesn’t clear the targeting queue in the UI. That’s a minor problem since on the server you still won’t be able to target directly. Mostly needs some client UI work since the targeting system is all client-side.
Slot Machine…
Posted: 2014-09-11 Filed under: Guildsmanship, WPF Leave a comment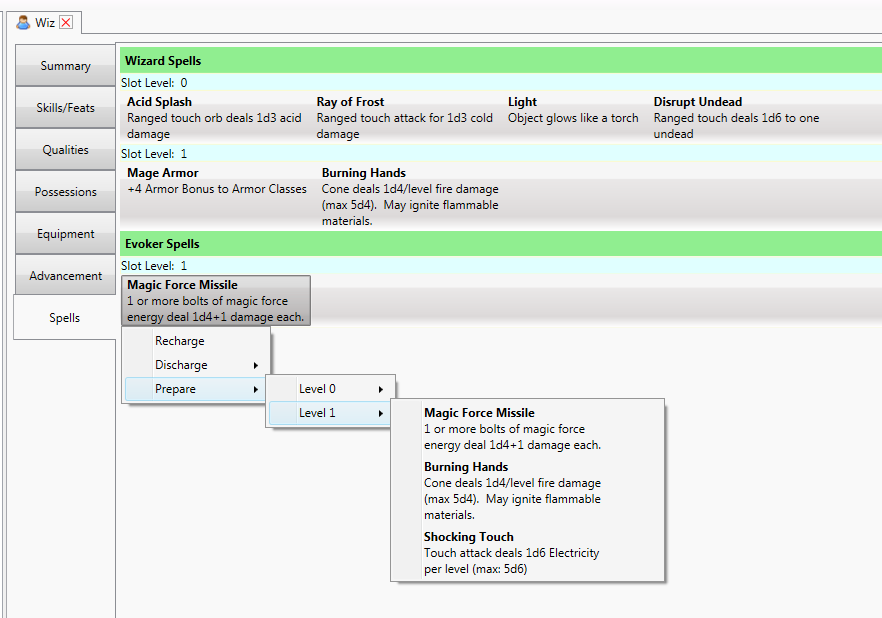
Here’s what I was really working on when I mentioned slots a few posts back. Workshop setup of spell slots. I’ll capture a picture of casting a spell in the client a little later.
Also, with about 10-15 minutes of time and existing model fragments, I put this together:

The Itsy Bitsy…
Posted: 2014-09-09 Filed under: Guildsmanship, WPF Leave a comment
I’ve been meaning to put together the model fragments (and the whole model) for a spider or awhile. Ta da! Now I just need to get Climb Movement in the game engine fully implemented (and various web actions and effects) so the spider can be more menacing.
Misfire
Posted: 2014-07-29 Filed under: Debugging, Guildsmanship, WPF Leave a commentI have a targeting system and activity builder I’ve been working on to pick targets for actions. One target type that I’d been working on a lot over the last month was attack targeting. I’ve got it fairly well along, so I figured I’d go back and apply a similar design principle to awareness targeting.
Attack targeting requires making attack rolls and needs to know certain things about the type of attack such as whether the attack is with a hand held weapon in melee range versus a reach or ranged weapon, and the effective attack launch points. Awareness targeting requires a simple selection of creatures or objects of which one is aware. I already had a basic system that used all the things the actor is aware of in a drop-down list, but wanted it to work more like attack targeting in which if I pre-select items, they are the only things that show in the list.
Well I eventually got the two fairly similar, but hadn’t worked out all display characteristics for the selection list items. So I was testing and picked the first two items in the list for my two magic missile wand test. I hadn’t quite realized I had targeted myself until I didn’t see any missiles visibly flying to targets, but the tell-tale impact splash was centered on my camera.
Dutifully I rolled both missile damages, then watched as my display window went black…I had knocked myself unconscious and dying.
Yay!
Skeleton Model
Posted: 2014-07-02 Filed under: Guildsmanship, WPF Leave a commentOK, no rib-cage yet, so I threw some kind of leather armor over him…


better render
He’s mostly the result of testing out parameterized fragments, with a little bit of the skeleton face and head I produced a month or so ago. Working with Skeley has helped me fine-tune some things in model construction and see where some impedance barriers to smooth asset creation are.
The second picture is direct from the model editor, where the field of view is apparently slightly better. I also made it possible to swap roll and yaw axes on fragment nodes, so I could more easily roll the sword (which is oriented so that it rolls around the z Axis instead of the Y axis)
Also, he keeps me from working more on the targeting system in the client…
Zombies
Posted: 2014-06-05 Filed under: Guildsmanship | Tags: zombie Leave a commentSince I spent so much time on skeletons and traits over the past few weeks, I had hoped to get some benefit out of all that work when applying it to zombies. Apparently I did: took me about 45 minutes to add basic zombie support. There are still some things missing (zombies get single actions only, but I believe I mostly implemented something for this already), I’m not entirely satisfied with my way of “cloning” the flight movement and making its maneuverability rating “clumsy”. Also, I need to put some constraints on applying replacement creature templates, and some standard processes for replacing the in-map locator token and the token model.
Right now, there’s nothing preventing an animated object from being made a zombie or skeleton, nor from a zombie or skeleton being made a zombie or skeleton! There’s also a little bit of fuzz to work out on zombies that are based on creatures with partial power dice; but all in all, a good start to my dabble in virtual necromancy.
Creature Templates
Posted: 2014-05-19 Filed under: Guildsmanship Leave a commentReading the SRD, one might think there are only two types of creature templates (changes that can be applied to a creature to make it more powerful). These are: acquired and inherited templates.
Acquired templates are supposed to be templates that are added to a creature well after it has acted as a a non-templated version of the creature, and includes such things as lycanthropes (were-wolves, were-rats, etc), ghosts, zombies, skeletons, liches and vampires.
Inherited templates are supposed to be templates that are part of the creature make-up from the beginning, such as fiendish, celestial, half-fiend, half-celestial and half-dragon (but which may also include lycanthropes!)
When attempting to program these, I can identify four semi-distinct categories:
Altered Species
Fiendish, half-fiend, celestial, half-celestial and half-dragon fall into this category. Typically used for creatures that do not progress by character class (or have some progression with “racial power dice”). Rather than use the standard species traits and progressions, the altered progressions and traits are used instead.
Replacement Creature
Ghost, skeleton and zombie fall into this category. There is a base creature instance which is used to build out the replacement creature. The original creature needs to be tracked in case the template is removed (that is, the condition that made the replacement creature is undone).
Replacement Creature with Advancement Alterations
Liches and vampires use this style. The base creature instance is used to build a replacement creature, but the creature can advance in character class. Any subsequent character class advancement may be altered from its normal class features (typically power dice size), but also may include strengths of special powers such as spell resistance.
Advancement Class Analog
Lycanthropes gain a number of “racial power dice” indicated by the type of lycanthropy. These act like a character class, but care needs to be taken in removing the “affliction” (class and power dice) since it is possible to advance in character class level after gaining the “affliction”.
